Thursday 30 June 2011

Me-Made-June '11: Days 29 & 30. The end.

So, lovely peops, here we are. The final installment in the latest Me-Made challenge. I don't really have any shocking revelations to divulge, I'm afraid. Unless you view 'could do with a couple more cardi's and maybe another jacket' as shocking. Maybe you do.

Day 29:


  • Denim high-waisted shorts

  • Black cotton Port Elizabeth top

  • Pants

  • Saint cardi worn to and from work
It's funny how these shorts were intended to be all vintagey pin-up in style, yet combined with this looser slightly cropped top, the whole thing has a more contemporary vibe. I liked wearing this outfit, but I kind of felt in camoflage, like I was pretending to be someone else. I don't like a lot of contemporary styles at the moment (I hate those pleated front trousers that taper at the ankle, and those baggy silk blouses with the hem line that shorter at the front, for example), and I feel like I'm not being myself in this. However, I'm now a firm convert to the high-waisted shorts, but must remember that high-waisted shorts are for life, not just for Me-Made-June.

Day 30:


  • New Frida Kahlo dress

  • Refashioned cardi

  • Pants
Ha! Surprise! A mental new garment in which to celebrate the end of an explorative month. This is the first wearing of this dress, and I'll formally 'introduce' you soon in its own especially devoted blog post. It's actually really comfy, but I did have to explain to my boss why I was wearing a bizarre child's party dress to work this morning.

So. What now? Now I'm going to go back and have a good look through my self-stitched outfits and garments worn this month and try to figure out what suited me and where I need some work. I made no attempt towards any kind of wardrobe planning, preferring instead to sew at whim, but I do feel some lessons in silhouette and layering are in order.

If you have participated in MMJune '11, have you learnt anything this month? If you are a repeat participator, have you learnt anything new from previous challenges? Has participating in this challenge brought up anything you didn't expect? What turned out to be your favourite garment/outfit and why? Are there any garments you'll ditch after this challenge? Anything that has rose in your estimations? And on a selfish note, which of my outifts/garments that I rocked this month do you feel looked the best? Knowledge is power, afterall!

And onto the inevitable question: will there be another? Ummm, YEP!!!! Of course! I know that for participants of Me-Made-June '11, the thought of taking and uploading another month of documentation photos is probably as appealing as stepping in cat poo right now, but each of these me-made challenges really does have its own flavour, revelations and fun, so hopefully some of you will join myself and any newbies in September for (can you guess?!): Self-Stitched-September '11!!!!!! Thank you and goodnight.

Tuesday 28 June 2011

Me-Made-June '11: Days 25, 26, 27 & 28

Don't worry peops, this is the penultimate view into my daily wears this month. I have to say that seeing myself in my home-mades as others would is a very useful exercise, seeing what looks good and what, umm, doesn't. Anyways, let's crack on..

Day 25:

This was my chosen outfit for the fantastic meetup this weekend. Seeing as it was a celebration I wanted to wear something a little more special than what I would usually wear to wander around the shops. I'm glad this photo features my yellow jacket pretty prominantly, as it's done me proud this month but hasn't received the photographic recognition it deserves.

Day 26:

  • Denim trousers
  • Cotton top
  • Pants
  • Denim skirt later on
Damn, it was unexpectedly hot on Day 26! You've caught me trying on bras in M&S! I've just realised I haven't been in a changing room since I left my fashion trend research job in Barcelona last July! That's nearly a year! This photo reminds me of all those documentation paps I took in changing rooms for the very first me-made challenge that I undertook solo back in March 2010.

Day 27:


  • 50's day dress
  • Pants
  • Yellow jacket
    • Ha! Look, you can tell when it's warmer because my list of me-mades for the day is radically shorter! Now, as I mentioned in the original post about this dress, it's pretty granny-esque. As it turns out, along with the Bolognese, my mum hates this dress! Which I can totally understand. When she was developing her sense of style and beginning to use fashion as a form of self-expression in the mid-60's, she was rocking sharp mod-styles. She and her mates would be using those styles to move away from the fashions of the previous era, that of their parents, which this dress falls into. Anyways, it's super-comfy on a warm day. The blousiness maybe questionable stylistically, but it is a joy to wear when the English summer shows it's face.

      Day 28:

      • Wax fabric Anda dress
      • Pants
      • Yellow jacket
      Do you remember this wax fabric Anda dress? Of course you don't! I made it approximately 3 million years ago, around the neolithic period (Creationists don't believe this dress even exists). A long time before I even started this blog, though it did get an airing during Me-Made-May 2010. It recently appeared in a bag of stuff I'd had stashed at my folks' house. I'd virtually lived in this dress in Barcelona on hot days when I still needed to look semi-decent, so I guess I was happy to have it out of sight for a while.

      If you have been participating in MMJune '11, have you found yourself revisiting older creations as part of this challenge? How did it feel to be 'reunited' again?

      Monday 27 June 2011

      Brighton Meetup and Fabric Swap: debrief

      This weekend just gone saw the long-awaited Me-Made-June '11 celebration meetup and fabric swap finally roll around. A thoroughly awesome selection of lovely ladies and passionate sewers came to hang in Brighton from near and far. Lucky me!


      Tilly, Santie, Ally, Claire, Stevie, Laura, Suzy, Justine, Dibs and myself took a the opportunity for a photos whilst we waited for our final reveller, Aileen. Later we were also joined by my best mate Vic and my awesome new mate Rehannon (who, if we're lucky, will start her own sewing blog very soon).

      With so many of us, it was decided it would be easier to fit us into small sewing shops if we divided and conquered, so we split into two groups for a couple of hours, one group lead by myself and the other by Brighton-resident Stevie. My crew consisted of Santie, Tilly, Justine, Dibs and myself and they proved fantastic company. With the help of Patty, I prepared this little maps which provided some targets to aim for:


      My crew started at the Brighton Sewing Centre, then swung by Upper Gardner Street market to hunt through the bits and bobs. Oh look! It's Tilly hanging with some buttons at my favourite stall which sells vintage notions!:

      I was able to flex my haggling muscles and got both these rolls of anchor tape for £6 (probably about 30-40 metres in total! Tang!)

      And despite running the risk of becoming a stereotype, I hoovered up some buttons of my own at the Brighton Sewing Centre:

      We also spent some quality time with the contents of Ditto fabrics (where I narrowly avoided falling off the wagon for some anchor print cotton) though we decided to forego another fabric shop and Snooper's Paradise in favourite of coffee/cake/milkshake and natter in a cafe instead.

      When our shopping time was up, we headed to our rendezvous to hook up with the rest of the laydeez and showed everyone what we had all scored. Food and drinks occurred and a fair amount of nattering, then it was time for the second scheduled event: the fabric swap! We started by going round in a circle, and everyone who brought stuff to swap (which turned out to be a lot) talked briefly through what that had brought so everyone could eye up what they might fancy. Then it was decided that the person who brought the most to swap (Claire) should start proceedings. She held up one of her pieces of fabric, and once someone declared their interest and received it, it was then Claire's turn to choose an item from the mix. Whoever it was had brought the fabric Claire chose, it was then their choice to pick something of someones, and so on and so forth until more or less everything had been claimed and the last pieces were given away to any takers. Even the ladies who were new to sewing and therefore had no stash as such to swap went home with something, and no-one took home anything they didn't want, so I declare it a total success! Personally, I scored some lovely things in the swap and was able to off-load some stuff that had been sitting dormant in my stash for way too long. I came away with some lovely fabric and a couple of great patterns, all of which I'll share in a few round up posts in the near future.

      Swap-induced giggles:

      I kind of wish I had taken more paps on the day, but my camera batteries died, and anyway I was having too much fun to stop and take photos. Thanks so much to the lovely ladies who came down and made it such a thoroughly enjoyable day. I will certainly be holding another event in the early Autumn for more Stash Bustin', fabric-trading and fun, so I hope to see you all again and maybe even some of my readers who were unable to make this one. Love, hugs and good sewing karma to one and all!!!!

      Friday 24 June 2011

      Me-Made-June '11: Days 22, 23 & 24

      I've just become aware that there actually aren't that many days left in this challenge now. So if these documentation posts annoy or exhaust you, hang in there, not long til normal transmission is resumed. Personally, I feel I've kept on top of my documentation better this time round than my previous challenges. I must say a relatively stable internet connection has helped with that somewhat. But I also have a back log of things I want to post about: garments I've created and discussions I want to further, so in a way I'll also be pleased too when I have some brain and blog space to tackle those.

      Day 22:

      In the spirit of realising I don't have many days of this challenge left, I thought it time to crank out my new anchor skirt. As I predicted, I think it looks great with the navy blouse (which also features an anchor motif along the white trim detail). However, I failed to predict how difficult this skirt would be to walk to and from work in, OR how tight it would feel when sitting down. I don't care, I love this skirt so hard, I'll lose weight for it if I have to.

      Day 23:

      • Refashioned jumper
      • Denim sailor trousers
      • Vest
      • Pants
      • Coat to and from work
      After the constriction of the previous day, I decided to rock a more comfortable outfit on Day 23. However, upon reflection I feel the colours of the jumper and trousers are too similar. If you squint your eyes, it looks slightly like I'm wearing some bizarre all-in-one/jumpsuit! Can you imagine, a denim jumpsuit?! Or a knit jumpsuit?! Which would be worse?

      Day 24:

      • Sencha blouse
      • Navy capri pants
      • Refashioned cardi
      • Pants
      • Yellow jacket to and from work
      This photo is in accordance with Claudine's mini-photo challenge for Friday 24th, which is to have your photo taken with an animal. I am, of course, lucky enough to have a colleague that fits neatly into that classification. Otherwise I'd have to hang around outside and risk getting close to another pesky seagull or something!

      Oh, I've just realised you haven't 'met' these capri pants before. I made them a few months ago when it was way too cold to actually wear them. The pattern is from a Burda magazine from a couple of years ago, but I borrowed it from the lovely Michelle so can't be sure of which issue I'm afraid. They are really simple, a shaped waist band and side zip. I used some navy twill blend that has some stretch in it, which was a good call. However, to my surprise when I first tried them on, they are actually pretty high waisted. Therefore, they are not the most comfortable things after lunch, but deal-with-able, unlike the lovely red swing trousers. I was planning on making another pair in red to go with my Corazones blouse and this Sencha blouse I'm wearing today, I even have some (non-stretch) red twill sitting in my stash that are just the right shade. But these navy ones are not comfortable enough, nor get worn frequently enough yet, to justify making another pair at this time. I may still do so though. Or maybe I'll use that red twill for a 'Poetry and Clothing' project garment later in the year. Blah blah blahhhhh, would you listen to me wittering on!

      It's the Me-Made-June '11 celebration Brighton Meetup tomorrow, woo hoo!!!!!!!!! Have a great weekend peops xxx

      Wednesday 22 June 2011

      Bustier Line T-shirt Tutorial. Part 2: Construction

      So here's the second installment in my tutorial for making a bustier line T-shirt like the one pictured above out of two unwanted T-shirts. If you missed Part 1, which dealt with how to develop your pattern pieces and then prepare the garment pieces, I'd go and check it out if I were you!

      Ok, so the last tutorial installment left us with a pile of cut out pattern pieces (one upper front, one upper back, one lower front, one lower back, a pair of sleeves plus a strip we cut off the hem of one of your T-shirts). REMEMBER: I am using an overlocker (serger) here, but you can use a normal flatlock machine if you don't have one. Just use whichever stitch you find yields the best results with jersey (do some practice runs on your leftover scraps of T-shirt or jersey fabric). NOTE: if you are using an overlocker, don't cut off the 'tails' of thread as you go, leave them loose and we'll deal with them at the end and get a nice clean finish.

      Time to put those pieces together:

      Step 1:

      Unfortunately, you get thrown in the deep end, with one of the hardest steps coming first. We've got to attached out upper front to our lower front, and our upper back to our lower back. Start with the back pieces as they will be easier. With your lower back piece underneath and your upper back piece on top (right sides together) pin them together at the beginning of the join and the end, as well as in the middle by matching up those notches you so helpfully made yourself. Stitch together remembering to remove the pins before you run over them (particularly if you are using an overlocker!).

      Time to do the same with the upper front and lower front pieces. Remember to put your lower front piece underneath, it'll be much easier to ease on the upper piece to create those curves. In the picture below you can see I've begun overlocking the front pieces together with my half way notched matched up and pinned.

      Once your row of stitching is under way, you're going to need to gently ease the edges of the curves together to continue your stitching. Take your time and don't over stretch your fabric or you'll create a wierd effect on the final garment. You just want to gently encourage the edges to line up.

      When you've finished that tricky bit, you'll have two main garment pieces, back and front:

      Step 2:

      This bit doesn't necessarily need to be done now, but you may as well get it done and out the way. You need to finish the sleeve hems whilst the sleeve pieces are still flat. Here I have simply overlocked the raw edge, then turned the hem and stitched in place with a normal flatlock machine. You may choose to use a zigzag stitch, twin needle, three-step zigzag, leave the edge overlocked, leave it raw, whatevs.

      Step 3:

      Stitch your front and back pieces together at one shoulder seam only.

      Step 4:

      You know I said Step 1 was one of the tricky steps? For me, I find this to be the other difficult part, but once again it's ok if you just go slow. Time to bind that neck hole. Start at the beginning of your neck hole at the shoulder you haven't stitched together so far. Keep your body pieces face up, then lay your harvested strip of T-shirt hem on top with its raw edges at the edge of your neck hole. Now you are going to overlock or stitch (I'd maybe recommend a wide zigzag if you aren't using an overlocker/serger) the strip all the way along your neckhole.

      The trickiness comes in two forms really. #1, you don't want to stretch your neck hole as you sew or it won't sit nicely when you wear the garment; and #2, you need to pull the strip ever so slightly as you stitch them together so the finished neck binding doesn't gape or stick at a funny angle. Just take your time and don't worry if it doesn't end up perfect. A steamy iron can often do wonders to a jersey neckline, I've found!

      As you may be able to see below, I created a bit too much tension on the strip near the end which has created a little gathering effect. No probs, it'll barely notice when on an actual body.

      Step 5:

      A nice easy step after that last epic one: join up the second shoulder seam. You'll probably want to start at the neck edge of the seam because it'll be easier to get these matching nicely. Remember, keep those thread tails long if you are overlocking.

      Step 6:

      Ok, this step is a bit time consuming. We've got to put the sleeves in. Depending on your pattern, you may or may not have lots of notches to match up. Hopefully you've got notches at the top of your sleeve heads to match up with your should seams, if nothing else! There's not much I can say about putting your sleeves in, accept I would recommend having your arm hole pieces underneath and your sleeves pieces laying on top as you sew.

      Your top should now look more or less like this:

      If you were to put it on a stand, it'd look a bit like this!: an almost-garment!

      Step 7:

      My favourite step! Time to overlock/stitch your side and sleeve seams in one fluid motion! Start at the sleeve hems, make sure your side seams meet at the underarm point, the bustier line point and of course at the hem. You GOT to love how compliant jersey is to make matching all those points up pretty easy.

      Step 8:

      I forgot to take a photo of this step, but it's a simple tidying up of all those loose threads tails you've got hanging off your T-shirt if you've used an overlocker/serger. Take a wool needle and thread the tails up into the row of overlocking. My boss call this stage 'turning the threads', FYI. You should have to do this at both side of the hem, both sleeve hems and on one side of your neck/shoulder point.

      Ta daaaaaaaa!!!!!!!!!!!!!!!!!!!!!!!!!!!!!

      All finished! If I haven't made myself very clear about something, or I can help in any way, just leave a comment in the comment section and check back there in a day or so, that way if others have the same question, it'll be there for them to see also.


      If you use this tutorial, or parts of it, please let me know or leave me a link or something. I'd love to see your creations!

      Tuesday 21 June 2011

      Me-Made-June '11: Days 19, 20 & 21

      With no further ado, I'll get on with documenting MMJ '11.

      Day 20:

      • Black sailor trousers
      • Stripey T-shirt
      • Refashioned cardi
      • Pants
      • Yellow jacket when I went out
      Not the most exciting outfit in my repertoire, but not bad for a Sunday avec un petit hangover. At least I managed to avoid the addition of seagull poo!

      Day 20:

      • Red Beignet skirt
      • Stripe T-shirt
      • Refashioned jumper
      • Pants
      • Yellow jacket to and from work
      Now, I'm not convinved the proportions of these garments work particularly well together, but you don't know these things 'til you try, eh? I do love wearing nautical colours though. You may have noticed that already.

      Day 21:

      • Black sailor trousers
      • Bustier line T-shirt I made the previous day for this tutorial
      • Saint cardigan
      • Pants
      • Yellow jacket to and from work
      Now, if I'm honest, when I was making that T-shirt, I was planning on giving it to someone, seeing as I already had a similar version. But when I tried it on to check the fit, it looked really nice to I decided to keep it! I can always make more....

      Monday 20 June 2011

      Bustier Line T-shirt Tutorial. Part 1: Pattern and pieces prep

      Some of you lovelies commented on yesterday's post that you liked my 
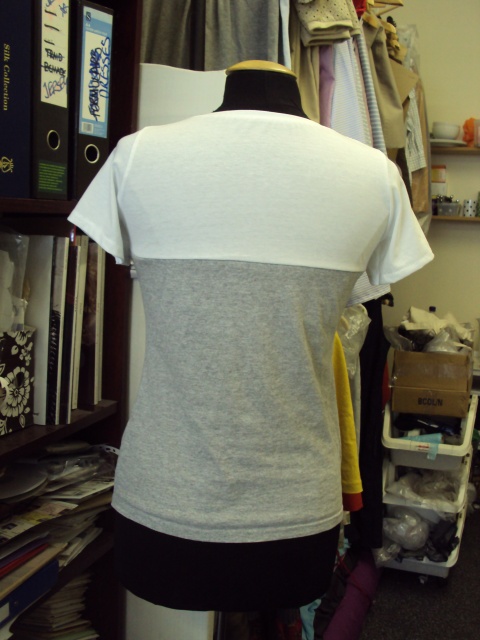
Bustier Line T-shirt that I made a couple of years ago, so I thought I'd make a little tutorial to show how you could make your own, should you feel so inclined. I made the T-shirt pictured above during my lunch break today and took photos of the steps, but even though it's a quick project to make, I think the explanation may prove too lengthy for one post. So today I'll deal with how you can develop your own pattern and prep the pattern pieces, then I'll create a separate post covering the construction process later in the week.

      Ok, so I made the top above from two old mens T-shirt so these instructions refer to this specifically, but of course you could simply use stretchy fabric and alter your construction as such. I've used existing T-shirts, because aside from the benefits of reusing textiles which might otherwise end up in a landfill, it's easy to incorporate some of the existing finishing making the whole process quicker and easier for you. I am using an overlocker (serger) for this, but you could use a normal flat-lock machine, either way, I'd recommend practicing joing together stretch fabric until you are happy you have the right tension/threads/etc. Here we go....

      Step 1:

      You need a fitted or semi-sitted T-shirt pattern to begin. Some people like the Burdastyle Lydia pattern, for example. Personally, I tried it but didn't like the fit on me, so I developed my own basic fitted T-shirt pattern by tracing the basic shape of an existing T-shirt of mine, then using the plain T-shirt pattern with set-in sleeve (meaning the sleeve head a normal, has no gathers, tucks or frills etc.) from the Sew U: Home Stretch book to trace the armholes onto my front and back pieces and the sleeve shape. IF YOU ARE MAKING YOUR OWN PATTERN DON'T FORGET TO INCLUDE SEAM ALLOWANCES. Sorry, I didn't mean to shout then, I just wanted to emphasise that.

      I traced a new scoop neckline and then plotted the shape I wanted for my new bustier line. Don't forget you also need to plot the back line, which I just took straight across but you may prefer to curve slightly. The process looked a bit like this:

      Please note that when I made this pattern, I didn't have access to proper pattern cutting/drafting paper, so used to use anything I could get my hands on including baking parchment (which was used here, which has the added benefit of being slightly transparent which is useful for checking your pieces against each other), grease proof paper, the plain side of wrapping paper, brown paper, etc. If you're new to developing your own patterns, don't feel you need to fork out on that expensive stuff sold in packets in your haberdashers, unless you want to of course.

      Step 2:

      Once you've got your basic front, back and sleeve pieces, you might want to make a plain version to see if you like the fit before making the extra effort required for the bustier line version. Anyways, of you are happy to proceed, you need to trace off the shapes of the body so you have four pieces: Lower front, Upper front, Lower back, Upper back. I would recommend using a tracing wheel for this, but it's not essential if you are using semi-transparent paper. Important point: YOU NEED TO ADD SEAM ALLOWANCES ONTO THE BUSTIER LINE EDGES. I'd recommend 1cm (3/8"), though I think I only used 0.5cm on this particular pattern. I really wouldn't add the standard 1.5cms (5/8"), because joining the two edges of the curve would be a total headache. So here's what my newly traced off and separated front pieces look like:

      Did I mention you need to add seam allowances to the bustier line edges?! A close up to prove I did (you can just see the holes in the paper made by my tracing wheel but I lazily didn't draw it in pencil before I add the seam allowance). When I made this pattern, I didn't think anyone aside for myself would ever see it, which is why I've cut corners. But inexplicably, I DID write on the pieces what they were, I'm not normally that structured in my practices!

      Here's my back piece with the new line drawn in. You know how I just said I sometimes cut corners? Well, I never bothered to trace these off, I just marked my seam allowances straight on them folded the unwanted bit away and cut, then folded it the other way to use the other section when cutting out. Risky, unless you are firmly sure you're not going to forget those seam allowances!

      One point on notches: personally, I use a few strategic notches to help me marry up seams as I sew. For this project I notch the front and back of the sleeves, which correspond to notched on the armholes, plus the top of the sleeve head which meets the shoulder seam. I also notch the CF (centre front) and CB (centre back) of the upper and lower pieces of my fronts and backs along the bustier line to help you meet the mid-points when you sew them together. This is particularly important for the upper front and lower front because sewing the curve together is probably the trickiest step of this project.


      Step 3:

      The fun design part! Raw materials. As I said above, I'm using a couple of unwanted mens T-shirts. But you could create some cool variations using patterned or striped and plain, or printed or whatever. One thing I would mention though, you'll find construction easier (but not impossible of you choose otherwise) if you use two fabrics of a similar weight and stretch type.


      Step 4:

      Time to cut out those fresh lovely pattern pieces of yours. Start out with your lower front and lower back pieces. If you are using T-shirts like me, just cut up the side seams so you can open the garment out. Fold it in half and lay your pattern pieces against the fold line. NOTE: if you line up the bottom of your lower front and lower back pattern pieces with the existing hem of the T-shirt, you'll save yourself the hassle of finishing the hem of your new garment.

      FYI, those black circles are weights. I rarely use pins (which allows me to save time and make myself a new top during my lunch hour!). Call me lazy, I can take it.

      Do this for both the lower front and lower back piece. Remember to make a little notch at the CF and CB along the bustier line:

      Only a little notch/snip, mind. Make it visible (otherwise it's useless) but no more than half your seam allowance:


      Step 5:

      Before we cut out the top parts of your pattern, a little tip is to harvest the hem of this T-shirt. Cut it off neatly to form a strip which you can use to bind your neck edge (we'll deal with that bit in the second part of this tutorial). You can cut it off however deep you wish your neck edge to be, but I personally like to cut inbetween the two rows of twin-needle stitching most regular T-shirts have at the hem.


      Step 6:

      Open the rest of this second T-shirt up like the first, and cut out the upper front and upper back pieces along the fold line. Don't forget to make the corresponding notches at the CF and CB along the bustier line.


      Part 7:

      Don't forget your sleeves! If you keep the remainder of the T-shirt lying flat like this, you'll always cut a pair instead of two of the same (I've done that too many times for it to be funny anymore!)


      Part 8:

      Put the kettle on! You've totally earnt a cuppa coz we're all done.

      As I say, I'll knock up 'Part 2: Construction' later in the week, so pop back to this blog to see my method of putting the pile of pieces which are now sitting there looking at you into this:

      Sunday 19 June 2011

      Me-Made-June '11: Days 16, 17 & 18 PLUS The Red Swing Trousers Saga

      Howdy peops, I'm guessing that right now you're wondering what I've been wearing over the last few days. No? Oh, I show you anyway...

      Day 16:

      • Denim sailor trousers
      • Stripey Sencha blouse
      • Refashioned cardi
      • Pants
      • Jacket worn to and from work
      Ok, I like these trousers better with a top that isn't tucked in like this.

      Day 17:

      • Lace embellished dress

      • Saint cardi (not worn in this pic so don't think your eyes are going funny)
      • Pants
      • Jacket to and from work
      • Patty's shirt
      The reason for the silly shot is Claudine's mini-photo challenge in the MMJune '11 Flickr group. Friday's challenge was to have your photo taken with a loved one, so we channelled a faux-Victorian vibe for ours!

      Day 18:

      • Red linen swing trousers
      • Bustier line T-shirt
      • Saint cardigan
      • Pants

      • Coat worn when I hit the streets
      So I have yet had the opportunity to introduce these new trousers of mine. I'll explain.... During the last Brighton sewing meetup, I met the lovely Handmade Jane, who was rocking a stunning hand-made outfit including the gorgeous wide-legged navy trousers that I'd previously covetted over on her blog. The looked equally as fantastic in real life. As we were wandering round Brighton having a natter, I remarked that they would look awesome in red linen for summer, and less than half an hour later Jane and I were with the rest of those lovely ladies in Ditto fabrics staring at some stunning deep red linen blend. Jane very sweetly offered to lend me the pattern, the fabric got purchased, and a plan was born.

      I must admit, I felt a little guilty about buying new fabric, but the 2m I needed is the only fabric I've bought so far this year. Jane must have popped the pattern (Simplicity 3688, a 1940's reprint) virtually the second she got home, bless her, because it arrived at work very soon after. Wide 40's-style swing trousers had been in my mind recently, and thought that these would fit pretty well into my vaguely retro-tinged wardrobe. They went together very quickly and the linen/cotton blend seems to have been a good choice.

      Apparantly the wind decided you couldn't see them properly!:

      But there's a 'but'. Well, a couple of 'buts' actually. One being that I'm not sure this type of high waist suits me. I'm short-waisted, meaning I have bugger-all space between my natural waist (the smallest part of my mid-section) and my bust. I like rocking a high-waisted look, but I don't find this 'high waist with a waistband' variety to be very flattering. They do nothing to flatten my belly, unlike my high-waisted shorts, in fact I think they kind of emphasise it (I chose the most flattering of shots taken, if you don't believe me, I have photographic evidence to back up my statement!).

      The second 'but' is one of comfort. They fit perfectly in the morning, AKA, before lunch. Now, I don't know about you, but when I eat when my stomach is in anyway contricted my a waistband or belt, I get really bloated and feel uncomfortable for the rest of the day, until I can get home and put my jam-jam bottoms (pyjama trousers) on. In fact, the first time I tried out a day in these trousers, I got so uncomfortable after eating an epic lunch, that the button literally popped off on my way home! It's taken me a good six years to finally acknowledge the whole bloating phenomena, and I just don't want to feel uncomfortable any more. So, as much as it pains me, because pre-lunch they reallly do look great, I'm going to give these trousers to a better home, to someone with a slightly smaller waist than me and no belly to speak of, who I'm pretty convinced with adore these. If you love something, set it free, right?!

      Oh, and on my way home from town, I was the victim of a seagull-poo attack, so had to get changed (into me-mades: black sailor trousers, black jersey top and refashioned cardi) to go and play poker in the evening:

      What a day!
      Related Posts Plugin for WordPress, Blogger...