Saturday 29 September 2012

Wedding-Interupted Broadcasting


This is a scheduled post that I wrote a few days in advance. That is because today I am busy getting married and celebrating!!!! Crazy times. A couple of days after the wedding we are due to go on our honeymoon to NYC. So many exciting things happening at once...

So, in regards to this blog, what kind of impact will all this have? Well whilst it'll be radio-silence from me for a week or so, I have three wonderful sewing bloggers lined up to provide guest posts to entertain you in my absence. I've already been privy to their posts, and let me tell you that you are in for some inspirational awesomeness! 

Upon my return I promise to share photos of the wedding, in particular my self-stitched wedding dress, my best friend's bridesmaid dress and Patty's waistcoat. I also want to show you my mum's incredible dress that she made herself that was inspired by sewing-blogland. Plus, I'll let you know how I faired on the bountiful fabric-and-notions-laden streets of NYC!

See you on the other side my friends.
Zoe xxx

Friday 28 September 2012

Refashion Friday Inspiration: Leather Applique Sweat Skirt


This refashion is certainly an acquired taste! I'm not sure even I would wear an anchor this huge. Oh wait, yeah I probably would. Anyways, what I really want to get across with this refashion/remake/upcycle is that old unwanted mens sweatshirts don't have to be remade into sweatshirt tops, they can also be sweat skirts! It's such a quick project that you could whip one up in a very limited window of sewing opportunity, all you need is a sweatshirt, thread and wide elastic. 


Cut the arms off the unwanted sweatshirt and then cut along the shoulders so you can pull the remaining tube on. You can then get an idea for how long you want to make the final skirt. You will also see how much you'll need to take in from the side seams and with what kind of shaping to get a nice fit. I used an overlocker/serger to restitch the sides and to neaten the top raw edge, but sweatshirting doesn't really fray so you can use a normal sewing machine, no bother. 


Although you'd probably want to taper the top of the skirt in slightly at the side seams, most of the waist fitting comes from the gathered, elasticated waist. I used some nice and chunky elastic for the waistband, which I feel is more appropriate for this sporty style garment. I made a very simple casing by turning over the top edge to the depth of the elastic and stitching it down with a normal straight stitch. As you can see, I can never leave well alone so added a leather anchor appliqué. But if you left it as a plain garment it would be a very versatile skirt. This type of refashion also works fabulously with plain or patterned knitted jumpers. Cosy skirts ahoy!


Monday 24 September 2012

My Handmade Style Interview


If you haven't read any of Joanne from 'Stitch and Witter' 'My handmade Style' series, I'd seriously advise you check it out. It's currently one of the most interesting things going on in sewing-blogland, IMHO. Joanne picks stylish sewing bloggers and asks them the questions you didn't realise you wanted to know the answers to, but suddenly you need to know the answers to!

I really love reading about why people sew what they do and what influences their stylistic decisions. To be honest, when I first read the concept behind Joanne's 'My Handmade Style' series, I felt a stab of jealousy that I hadn't been clever enough to come up with something similar myself! But I'm so glad that Joanne did pip anyone else to the post because her approach and depth of questioning make these interviews infinitely fascinating.

Following in wake of great interviews with Tilly and the Buttons, Dolly Clackett and Sallie Oh, the most recent instalment features myself. I'm very grateful to Joanne for asking me to be featured in this series, especially considering the talented and stylish women who are also part of this series so far. It was a fascinating process answering these questions, and I must admit it took me over a week of thinking about it and going back to them until I felt I had answered them accurately. I definitely feel I know my approach, inspiration sources, style and even myself better afterwards! Check out my 'Handmade Style' interview here...

Sunday 23 September 2012

Me-Made-Outfit of the Week


Me-Mades:

Pants (knickers)

Unlike many sewers, I am unable to plan my sewing projects. I never make any garments with even half an eye on what else in my wardrobe they may eventually get worn with. Instead, I tend to start whatever whim has the strongest pull at that time: whatever feels like it most needs to be sewn. This 'approach' could subsequently result in some potential wardrobe-orphans. My recent leopard print capris could so easily have fallen into that camp, with only my plain black batwing top apparently fitting with them in terms of style and colour. But then I had a thought, could you team leopard print with... more leopard print?! YES!!! I believe you can. 

Friday 21 September 2012

Refashion Friday Tutorial/How-To: Draft a Collar for a T-shirt Refashion/Remake


As useful as a plain t-shirt is, it hard to get excited about them, don't you think? I love how comfortable T-shirts are to wear but I prefer to add something or alter them in some way. I've been drafting cute collars to add to some t-shirt remakes which use a small amount of contrast woven fabric, great for stash busting those little pretty bits of fabric you don't want to through away. 


So, if you'd like to draft your own contrast collar pattern and aren't sure how to go about it, here's a tutorial:

Step 1:

You'll need a pattern of your front and back necklines, so if you are using a pattern to recut your old T-shirt you will already have this. If you plan to add a collar to an existing T-shirt that doesn't require reconstruction, you'll need to trace the neckline onto some paper. Fold your garment in half to give you the centre-front and centre-back and trace round the necklines.

Either way, make sure your new neck hole is big enough for you to pull it on and off ver your head without stretching the neck hole. Draw a nice scoop neck shape, the new collar will frame it nicely. Here's my back and front pattern pieces I've used to recut the old T-shirt:


Step 2:

Because I am a naughty lady, I often don't draw my seam allowances onto my self-drafted patterns. However, make sure your seam allowance (whatever it is, I've used a 1cm seam allowance here) is drawn onto the shoulder seams:


Step 3:

Overlap the front and back pieces along the shoulder along the stitch lines. It doesn't matter whether it's the back or front pattern piece that lays on top of the other. Whatever your seam allowance is for the rest of the T-shirt seams, I would advise a 1cm / 3/8" seam allowance around your neck hole for easy application of your collar. Draw 1cm / 3/8" in from the neck edge on the shoulder seam line:


Step 4:

Next you need to overlap your front and back pieces an extra 1cm / 3/8" at the shoulder point (the other end of the shoulder seam from the neck edge). Remember you are measuring 1cm / 3/8" in-between the stitching lines, NOT the cutting lines:


Step 5:

Pin the pattern pieces together in this position along the shoulder seam. Draw in the 1cm / 3/8" seam allowance around the neck hole:


Step 6:

Time to draw your collar shape. It may be useful to use a tape measure against another similar top to give yourself an idea of how wide you want your new collar to be:


Step 7:

When you are happy with your new collar shape, trace it onto another piece of paper. Remember, if you don't have any pattern drafting paper, standard tracing paper, baking parchment or grease-proof paper can work just as well. Add the seam allowance around the outside edge of your collar. You will be trimming most of the seam allowance off before you turn the collar through after stitching, so you may as well keep this seam allowance 1cm / 3/8" too:
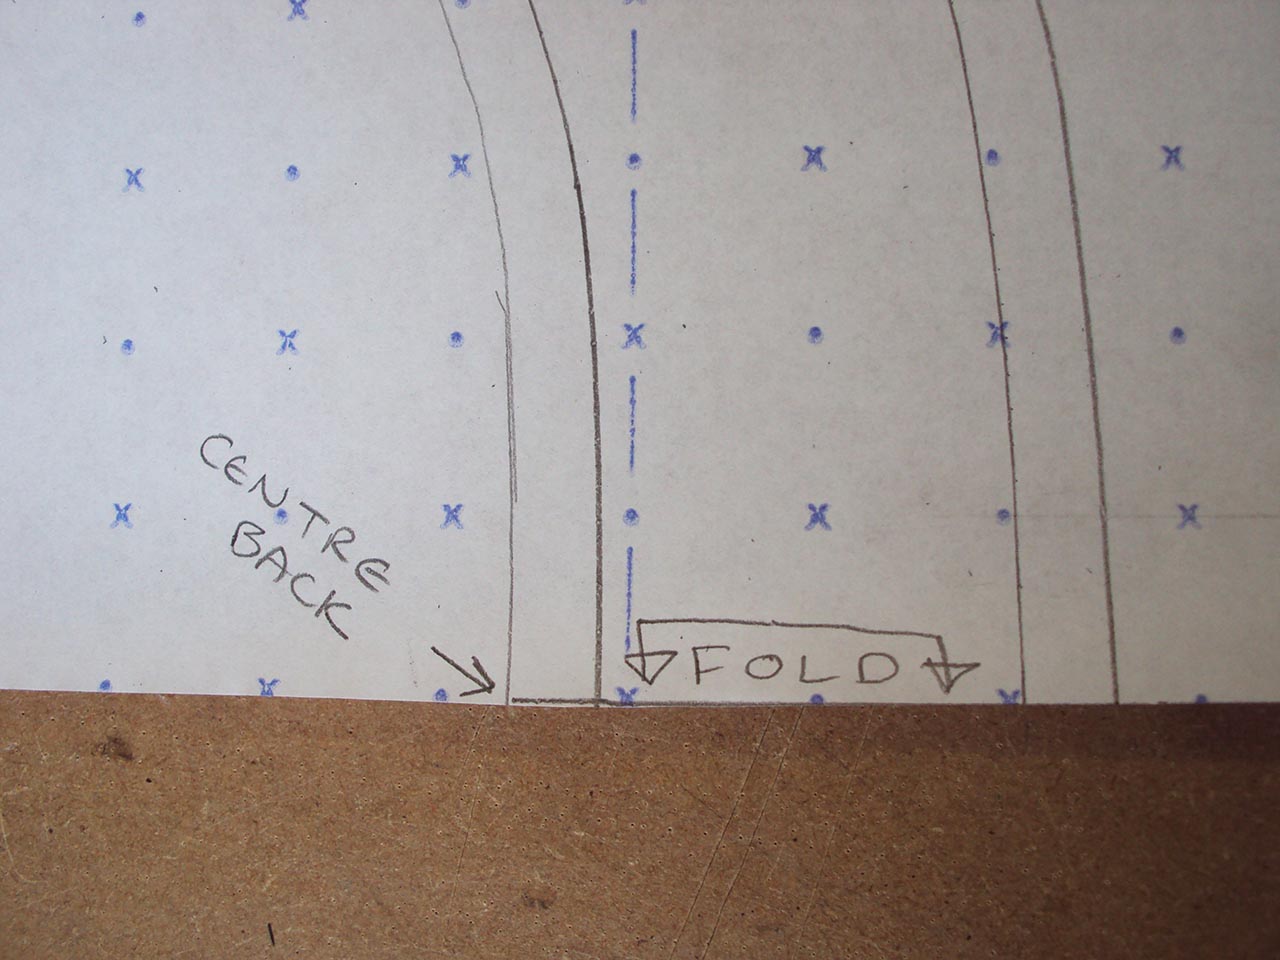

Step 8:

Make sure you've marked in the centre back and indicated that the collar pieces will be cut on the fold of your fabric. You can of course add a seam at the centre back and cut out two pairs of collar pieces, rather than one pair of collar pieces if you are cutting them on the fold. Cutting the collar in two pairs of pieces with centre back seams will be more economic in terms of fabric usage, just remember to add the extra seam allowance to the centre back if you plan to do this. Also, you will want to alter the grainline so it runs the length of your collar piece (see the photo from step 6 where I have drawn it in). If you plan to cut your collar out on the fold, the fold line will also be your grainline, I was running out of space on the pattern piece to write that in too!:


Step 9:

Very importantly, make sure you mark on your collar piece where the shoulder seam of your T-shirt will align. This will help you no end when applying the collar to the main T-shirt. Stitching a woven fabric to a stretchy jersey one can be a little tricky, so this point of alignment will make doing so much easier. When you cut out your collar pieces, make little notches at this point on all your collar pieces (snip in half the depth of your seam allowance):


Step 10:

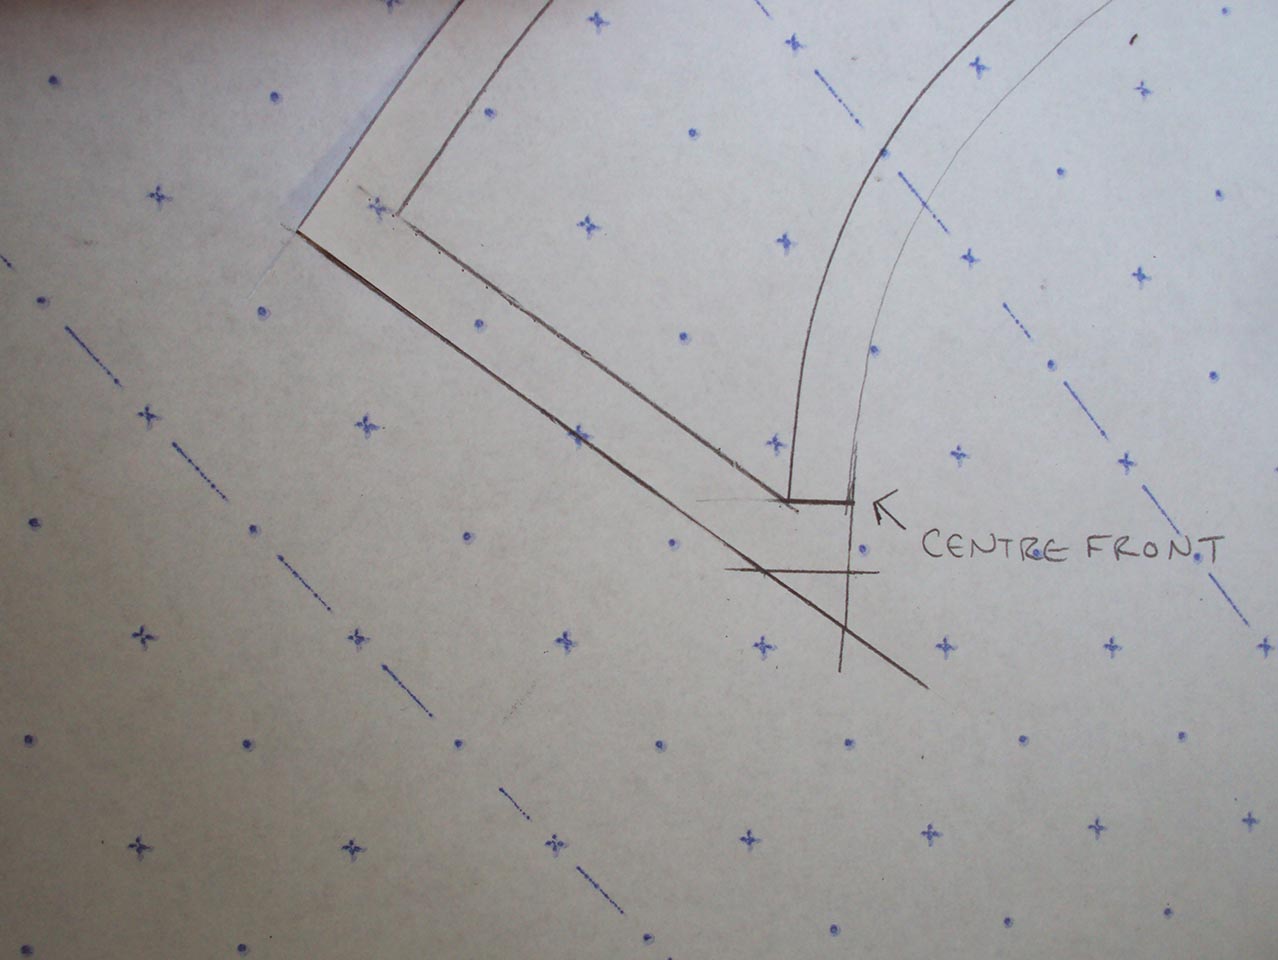
You may wish to make your collar rounded at the front, Peter Pan-style, instead of angled like mine. Either way, you need to know where your centre front point is on the collar. I squared off the seam allowance (see below) so I'd know where the centre front is easily:


Step 11:

Time to cut out your collar pattern piece. Cut 1 pair (AKA two) of collar pieces, unless you are making a centre back seam as previously discussed. Unless your woven collar fabric is super thick, I'd advise applying fusible interfacing to one of your collar pieces. The interfacing will give the finished collar more body and make it easier to apply to the neck edge. If your chosen woven fabric is quite light-weight, you may wish to apply interfacing to both collar pieces:


Step 12:

With the collar piece(s) fused with interfacing, stitch them together right sides together around the outside edge:


This picture below highlights how to stitch the corners at the centre front. Follow the squared off seam allowance:


Step 13: 

To get a really neat collar, trim away a lot of the excess seam allowance all the way round, in particular at the corners. Turn the collar through to the right side, carefully poke the corners to get them nice and sharp, then press the collar with an iron:


Step 14:

Now your collar will be ready to apply to the neckline of your garment. If you haven't already done so, make your T-shirt, being careful not to stretch out the neckline during the construction process. Because stretching the neckline should be avoided, if you want to check the fit of your garment before hemming, it is best to try it on after you have applied the collar.

The method I use to attach a collar to a T-shirt neck edge is just to overlock (serge) it straight on, although you may prefer to stitch it on using a normal sewing machine instead, and then neaten the raw edge after. I lay the woven collar on top with the jersey neck edge underneath and line up the front collar edge with the centre front of the jersey top. With the woven collar positioned on top of the jersey neck edge, you will find it easier to ease the jersey in if necessary when sewing them together. Remember to match up the shoulder point notches on the collar to the shoulder seams of the jersey top, and to match up the centre back points of both as you stitch round.


I then turn the 1cm / 3/8" seam allowance towards the inside and do a line of top stitching to secure it down about 0.5cm from the edge. The inside edge of my neckline then looks like this:


The outside edge of my neckline at the centre front usually looks something like the picture below. After the top stitching I give the neckline a good press with an iron to set it all nicely. The row of top stitching makes pressing the collar back into shape after laundering much easier too.  


There you have it! A pretty contrast woven collar for a your jersey top/T-shirt. I've added a ribbon bow to the top below, picking out one of the colours in the printed cotton I used for the collar. Adding a row of little buttons, like the top in the second picture from the top, might also be a nice extra touch.   

Thursday 20 September 2012

NYC Advice Please!!!


Dear sewers of the world, I need your advice please. In just over a week I'll be jetting off on our honeymoon to NYC. I'm so excited I might be sick, but there's a whole load of finishing off bits to do (oh, like my dress!) and the wedding itself before we go anywhere so I'm trying to control myself. We'll be there for a week and Mr 'So, Zo' is fully aware that I'll be spending a fraction of that time checking out fabric shops, haberdashers and other sewing related destinations. Which is where you come in: Where is best for a sewer to go in NYC?!


As you may know, I try to stay away from buying new fabric. But I'm going to allow myself to buy a few lengths of new fabric on this special trip. Plus, I'm a haberdashery junkie, so I'm going to need a hit of buttons, notions, books, patterns and so forth, even just to look at if not buy. So if you have some top NYC sewing-related tips, PLEASE leave a comment below.

Thanks in advance!

Tuesday 18 September 2012

Sew with 'So, Zo': October @ Super+Super HQ!


I am excited to announce that, starting in October, I will be teaching sewing and sewing-related classes at Super+Super HQ in Brighton. Now I know that most of the lovely readers of my blog are either already highly skilled sewers and/or don't live near South-East England, but on the off-chance that some of you might be interested, here's what I'll be teaching and when:

Class: Vest/Camisole/Singlet Making Session

This session will take you through the process of making your own vest from jersey fabric or unwanted T-shirts. Using my multi-sized vest pattern, we will go slowly through the steps from pattern preparation and cutting out the pieces, to construction using a sewing machine and overlocker/serger (no previous overlocker/serger experience necessary). By the end of this class, not only will you have a wearable, useful garment of your very own, but you will also have been provided with the skills and pattern you'll need to make hundreds more vests in the future.  

Will need to bring: 1 metre of jersey and/or some large unwanted T-shirts. Everything else will be available at the class.

Recommended for: All skill levels are welcome, but must have used a sewing machine before and feel relatively confident doing so. This class is ideal for someone interested in sewing with jersey fabric but isn't sure where/how to begin.

When: Friday 12th October, 7.00pm - 9.30pm

Cost: £26 

More info and where to book: http://vestmakingclass.eventbrite.co.uk/


Class: Introduction to Commercial Sewing Patterns

This session will designed to demystify and explain how to use commercial sewing patterns. This is a discussion and demonstration based class, not a practical 'doing' one. Topics covered will include:
  • What to do if your measurements span two or more sizes on the pattern
  • What to do if you are taller or shorter than the pattern has been designed for
  • What the differences between vintage and modern patterns are
  • How to select appropriate fabric for your pattern
  • What all the symbols on the pattern mean and what to do about them
And lots more. The perfect class for a Sunday morning with a tea or coffee in hand. 

Will need to bring: Nothing accept a notebook and pen if you wish to make extra notes.

Recommended for: This class is perfect for someone who has already taken a beginners sewing class or generally feels ok using a sewing machine, and now wants to amp their skills to become a confident dress-maker.

When: Sunday 21st October, 10.30am - 1.00pm

Cost: £24.50

More info and where to book: http://introtosewingpatterns.eventbrite.co.uk/


These classes will be repeated in November, I'll post about them after the October classes have taken place and the November classes are ready to be booked. If you know anyone who may be interested in taking these classes, please send them the links!!! Thanks in advance.

Sunday 16 September 2012

Me-Made-Outfit of the Week


Me-Mades:

Pants (knickers)
(Secondhand cardigan)

Does this outfit make me look like a mental pirate? I'm not sure. I've not really rocked the shorts with tights look much before. I do like how it increases the wearing season of shorts to longer than a handful of British days though. What about you? Do you like wearing shorts with tights? 

Friday 14 September 2012

Refashion Friday Inspiration: Bow Detail Jeans Cutoffs / Denim Shorts


I must admit it feels a little odd writing a post about little denim shorts just as everyone in the UK reaches for their Winter cardigans, however these posts are not Northern-Hemisphere-centric. Plus there are, of course, heaps of people who live in places that get lots of sun all year round. So anyway, today's Refashion Friday inspiration is a slightly cuter and smarter version of the standard 'hack the legs of your jeans' style shorts. 


The first step, however, it to do just that: hack the legs off your old pair of jeans! I then overlocked/serged the raw edge and hemmed it to create a neater look than the usual frayed edge of cut offs. (I promise the legs are actually even in length, despite how they may look in the above two photos!)


I wanted to play with some contrasting fabrics to form the side bows. I used two types of spare quilting cotton, a red one with little white polka dots for the main part of the bow, and strips of a contrast floral print to make the centre 'knot' section. 


All that was left to do was to hand tack the bows close to the bottom edge of the shorts at the side seams. For real versatility, you could attached the bows using poppers/press studs and make a range of different coloured/patterned bows. Then the outfit combos would be limitless!


Thursday 13 September 2012

Leopard Print Clover Capri Pants


I know, I know, with my wedding dress not yet complete and the actual wedding only two weeks away, I probably shouldn't have been making capri pants. And yet... I now have LEOPARD CAPRI PANTS (or clam diggers/pedal pushers/cropped trousers/whatever you prefer). I did say in my post-wedding sewing plans post that I may not be able to wait to get these babies made. 


After the success of my navy cropped trousers and the incredibly fortuitous acquisition of some second hand leopard print sateen, my desire to create a version of the above style was just too strong. I love this kitschy retro-y Rockabilly look. When my version are teamed with my plain black batwing jersey top (as shown in these photos), I think it's a wearable day or evening look that references the original inspiration whilst being a little more modest and comfortable. I must also mention that Suzy also created a kick-ass pair of Rock Chick trousers using the same Colette Patterns Clover style. Check them out, hers are truly awesome.


As for the pattern, I did a fair bit of tweaking to get a good fit. I'd already made quite a few changes to the pattern for my original navy pair, but that pair had come out quite big and had required a chunk taking out of the side seams. I love those navy ones, they are very comfortable and I wear them all the time, but I knew I wanted a tighter silhouette for this pair. So I went back to the original pattern, traced a size smaller this time, and then made the same adjustments. Those adjustments, if memory serves, included increasing the back rise by about 2cms, increasing the front rise by about 1.5cms and widening the waist measurement and reshaping the top side seams and waistbands to accommodate that new measurement.   


The fit of these is great. The one issue that a perfectionist (or my former employer when I used to pattern cut for him) would have a problem with, is that the top of the waistband sits lower on my waist at the back than at the front. It's not a massive discrepancy but I did clock it. But personally, I feel life is too short to worry about that.  


The tighter fit and slightly less stretchy fabric means that I doubt they'll get as much wear as the navy ones. However, I'm excited about donning them with some heels and red lipstick and hunting down a cocktail or two, maybe even on our honeymoon in a couple of weeks!

Tuesday 11 September 2012

Style Inspiration: Pulp Fiction Divas


In a bid to understand my own personal style a bit better, I've recently been thinking quite a bit about the looks, eras and themes that inspire me. One particular inspiration source that I keep coming back to is the illustrated covers of pulp fiction novels. I love the trashy drama and dark sexiness of them. The women are all decolletage and hourglass curves, shiny hair and pristine lipstick with a wicked, passion-filled glint in their eye.

Now I'm obviously not lusting after, or even vaguely condoning, an image of womanhood in which women only have their sexuality to help them to attain what they want or need. Plus a world in which people, in particular women, are usually categorised as 'bad' or 'good' (of morals) is clearly a ridiculous one. However, these intellectual considerations do not dispel my enjoyment of their kitsch, lusty imagery, nor do they rid me of my desire to create some pulp fiction inspired looks. When I want to access my inner vamp, it is often these type of images that my imagination accesses. So how to go about creating these looks...


It seems quite clear from the top two illustrated covers that the staple garment in a pulp fiction vixen's wardrobe is the slinky pencil skirt. Demure in length but so tight it looks sprayed on, the wiggle/pencil skirt is key. For comfort and ease during a particularly rushed getaway/chase, I'd recommend using fabric with a decent elastane/lycra content. A metre of shiny black sateen and a skirt pattern like the vintage Advance 8761 pictured below, and you could have an amazing evening wear pencil skirt like the bewitching brunette's picture above in about half a day's sewing! 


Basic pencil skirt patterns are easy to find, a quick scan on ebay and I found a squillion vintage ones in a variety of sizes. There are heaps of great modern basic pencil skirt patterns too. If you wanted to really nail the look, you may need to tweak the proportions a little. The waist band really needs to sit the smallest point of your torso and the hem needs to hit below the knee. 


My goodness, these good-time gals do dress to be noticed, don't they?! This blonde bombshell confirmed my suspicion that I could use a yellow pencil skirt in my arsenal. The cheeky side split showing a touch of thigh is an interesting deter from the standard pencil skirt style. This pencil skirt pattern (pictured below) available on Burdastyle has princess seam lines which make it very easy to convert into the side split style of the yellow skirt in the illustration above. 
These are Queens of the separates: when pulp fiction divas aren't rocking a pencil skirt they are often portrayed in capri pants/clam diggers/pedal-pushers. Sitting equally high on the natural waist-line, we are not allowed to forget those hips for a minute!


I'm a massive fan of capri pants at the minute, and will continue to wear mine until the weather breaks and Autumn comes crashing in. The image above is doing nothing to calm my desire for a red pair, but with equal nautical potential are pale blue ones like the picture below.


Vintage capri pant sewing patterns in the appropriate sizes are not quite a easy to come by as vintage pencil skirt patterns, but they are out there for the hunting. The pattern below shows some cute options for the side hem area other than the standard split. A couple of contrast or covered buttons or little self-fabric bows might also be nice. Not that we are focussing on 'nice-girl' looks today!


An option that is far simpler to obtain might be the Clover pattern by Colette Patterns. This pattern dictates that you use fabric with a decent stretch content, which would be great for creating the tight mid-century look. 


Ok, so we've got the bottom half sorted. What are we going to pair all these fabulous wiggle-inducing pencil skirts and hip-hugging capri's with? The white top in the very first image and the black top on the cover of 'On The Road' pictured above both seem to have grown-on/kimono/dolman sleeves like the pattern below. This is a feature I LOVE, as you may have noticed in the post I wrote for the Colette Patterns blog many moons ago. The vintage Butterick 7490 pattern pictured below is wonderful because it gives a slash-neck/bateau AND a V-neck options plus variations of sleeve-length. 


Another fabulous separates option is a cute little button-up blouse. Awesome in a rainbow of solid colours or in stripes, polka dots or prints, the prim preppiness of these blouses is a great counter-point to the hour-glass silhouette they are helping create. 


When darkness falls, often the mix and match separates will apparently just no longer get you where you need to go. It may be time to pull out the stops and head straight to bombshell-ville.   


Burdastyle's Bombshell dress pattern (pictured below) could form the ideal mid-century pin-up look. Now, where to source second-hand red and gold striped fabric......   
An equally divine option is this stunning vintage evening sheath pattern pictured below. 


There does seem to be a hangover of the full-skirted 1950's silhouette in some of the pulp fiction cover illustrations. The rule seems to be that as long as the shoulders and collar bone and are exposed and the bodice is fitted, all is well! The Advance 9077 pattern pictured below in a solid colour might work if trying to recreate the green dress in 'The Lion House' pictured above.


One final strappy sheath dress for you:


Enjoy, vixens!
Related Posts Plugin for WordPress, Blogger...